Today is a very exciting day. Savage just launched the highly anticipated update – Procreate Version 4. If you’ve caught any of the hype, you can believe it. It is a massive, massive release!
I was lucky enough to be invited to test a very early version of the beta. At that point, it was possible to run it on the current version of iOS, but as the release date got closer, they needed to move to iOS 11.
The problem was, Apple’s iOS 11 was still in beta too! I hesitated at this point. I would usually wait a few weeks after official release before installing iOS updates. I had a brush pack release pending and I also wanted to be up and running for any customer support requests. With only one iPad, I didn’t want to risk any downtime using an unstable operating system.
Savage opened Beta Testing to the public in August. After a couple of weeks, I couldn’t take the suspense any longer and went ahead with the beta install of iOS 11. I was then able to run the latest Procreate 4 beta.
Ok, wow! This new version is bursting at the seams with improvements far beyond what I was expecting. We’ll go through the feature list in more detail in a future post, but from doing this I went through three steps to make sure I was fully backed up and ready to go. I want to share these with you so you’ll feel more confident if you decide to update to Procreate 4 too.
A Note for the Beta Testers
Just a note to be aware, if you took part in the testing and have a copy of Procreate 4 beta installed, now is the time to upgrade to the release copy. Your beta version will expire (not immediately, but soon enough) taking with it any brushes or artwork you created. I recommend installing the App Store version and moving your work over as soon as possible. You can update directly from the App Store.
Backup, Backup, Backup
As mentioned, in order to upgrade to Procreate 4, you will first need to to install iOS 11 on your iPad. New operating system updates are scary at the best of times, but given Apple only just released iOS 11 today, you are going to want to have a full backup of your iPad to avoid any irreversible teething problems.
Backing up might sound obvious, but I recommend doing this in a few different ways to cover your bases.
Step 1. Backup Your Procreate Gallery
Depending on how many files and what method you use, this is probably not going to be fun. But for piece of mind it is worth doing.
Backing up your ‘.procreate’ files to your computer, iCloud or Dropbox, will mean they are stored in an additional place and will be safe should anything go wrong with your iPad. This is a good habit to get into regardless of software updates.
Batch Exporting
Update 20th September (thanks to Patricia for this time-saving tip!)
If you would like to backup your Procreate gallery files to a computer, there is a way to save out multiple files at once. Not all destinations will accept multiple file transfer from Procreate, (Dropbox or iCloud don’t) but you could use Airdrop or iTunes instead.
For Airdrop, make sure you have Airdrop turned on on both your iPad and your computer. Select multiple files in your gallery by swiping each artwork from left to right (not right to left as you usually would when you share or delete them). You will see they highlight in blue. In the top menu bar you will see small ‘Share’ and ‘Delete’ icons. When you tap ‘Share’, you should see the option to transfer via Airdrop.
If you have trouble getting Airdrop to work (like I do. all the time!), this video has some troubleshooting steps you could try.
Failing that, follow the steps below to save out the individual gallery files.
Exporting files individually from Procreate
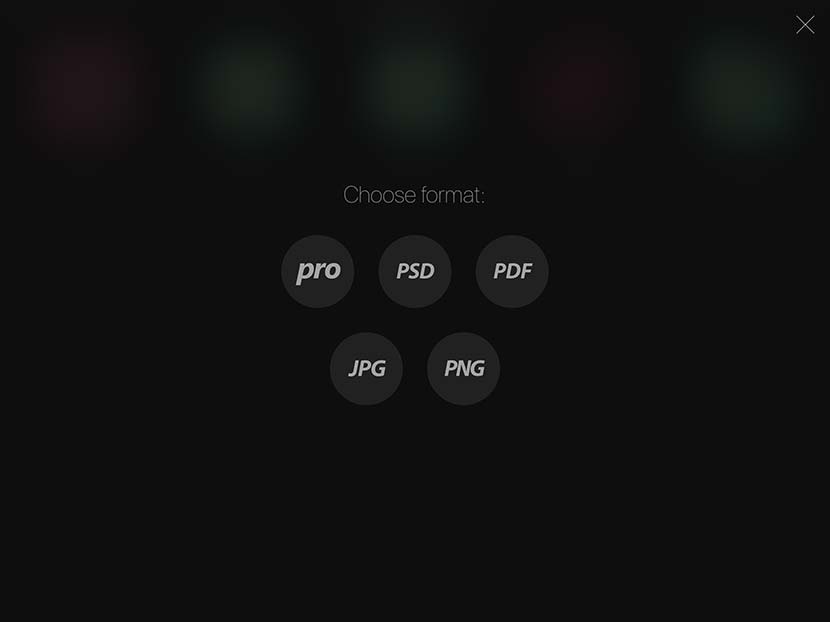
To export individual files and save to iCloud or Dropbox, open Procreate and you will see the Gallery Screen. Swipe the artwork thumbnail to the left and choose ‘Share’. The next screen will give you the option to choose the file format type. Select ‘pro’ and then choose whichever cloud storage you prefer (iCloud or Dropbox).
Repeat this and export all of your gallery artwork files.

Hopefully you have an external backup of your brushes already, but if not you’ll want to export these to Dropbox or iCloud too!
Step 2. Backup to iTunes
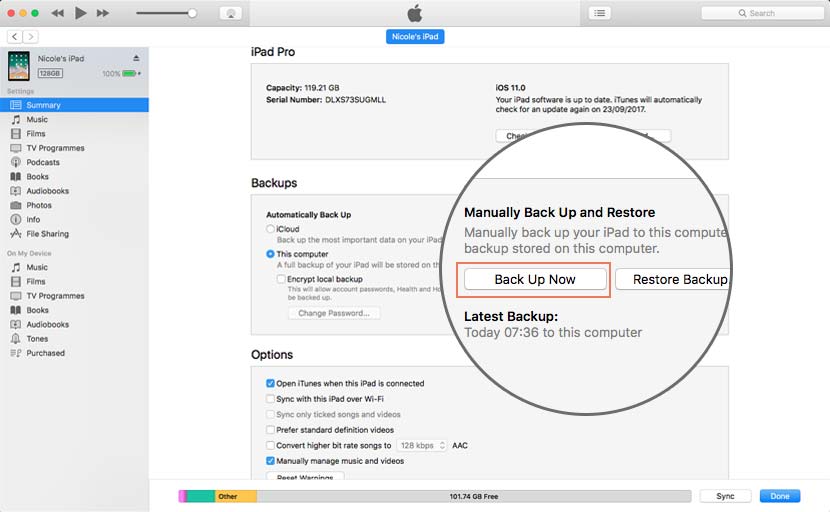
Once you have all your Procreate gallery files backed up, the next step is to backup your whole iPad to your computer with iTunes. You may have it set to automatically backup to iCloud, but for the purposes of Step 3, you will need a copy on your computer.
- Make sure iTunes is up to date
- Connect your iPad to your computer and open iTunes
- Click on the device icon shown in the top left menu
- If you have any health data, you need to tick the box for ‘Encrypt backup’ to create a backup with password protection. Make sure to remember this password, (even write it down somewhere) as you will not be able to reinstate the backup without it
- Select ‘Backup Now’ under the ‘Manually Backup and Restore’ panel
- Wait for the backup to complete and keep your iPad connected to iTunes for the next step

Step 3. Create an Archived Version of your Backup
Now you want to now create an ‘Archive’ copy of the iTunes backup you just made. Every backup you make overwrites the previous one. By creating an archive version, you prevent this particular backup being overwritten. This gives you the ability to return to it at a later date (even if you’ve made several more backups in the meantime).
It’s important to note, even with the archive backup you will not be able to downgrade to an older version of iOS. While iOS 11 was in beta it was possible to downgrade (a bit tricky, but possible). But once you go ahead with the official release you won’t have the option to go back.
This sounds pretty scary, but if you have a relatively new device you shouldn’t experience problems running it. If you rely on your iPad for production, you might want to do some research beforehand to see if it’s something you definitely want to go ahead with. In the relatively short time I’ve been using the iOS beta, I haven’t noticed anything drastic but it’s something you need to decide for yourself.
To create an Archive Backup:
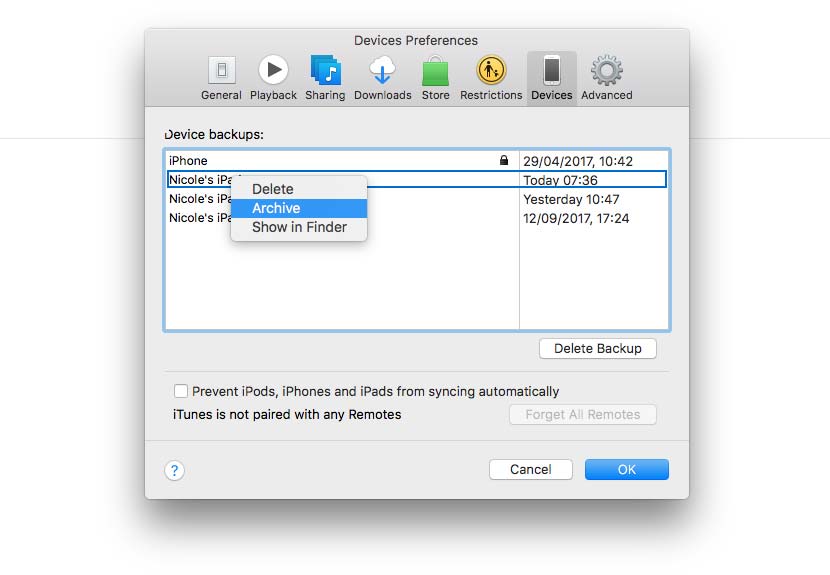
- Click on ‘iTunes’ in the top menu and choose ‘Preferences’
- Click on the ‘Devices’ tab
- You’ll see a list of your most recent backups. Ctrl click the backup you just made and choose ‘Archive’
Your backup is now saved and won’t be overwritten by the next one.

See this article for more information about how to restore from an archived backup.
Once you are all backed up, you can now update to iOS 11. You should then find Procreate 4 waiting for you in the App Store. If you don’t see it right away, just give a bit more time to propagate between regions.
I hope this information helps you feel more comfortable with the changes you need to make to run Procreate 4. As I said, it really is a phenomenal update. There will no doubt be a few bugs for Savage to iron out, but it hopefully won’t be anything too drastic.
If you get stuck with anything and need help, check the Procreate Forum. Otherwise, you can contact Savage directly. They have great customer service and are very helpful!
I would love to know what improvements you like most about Procreate 4. Please let me know if the comments below.


Cathy
Can you tell me if I’m just a casual user of Procreate what would be the draw to use the paid version vs the feee one. What are the differences?
Nicole Mauloni
Hi Cathy, there isn’t a free version of Procreate available, and has never been as far as I’m aware. Are you meaning the difference between earlier versions and Version 4?
Maria Clark
Thanks for this really helpful article. Can’t wait to upgrade to ios 11 and Procreate 4
Nicole Mauloni
You are welcome Maria! P4 is amazing and worth the upgrading efforts.