If you want to take your iPad Lettering to a professional level in order to sell digital artwork, design logos, handmade cards or commissioned illustrations, knowing how to create vector artwork is a must.
The fastest and easiest way to convert raster images to vectors, has always been to use the ‘Image Trace’ tool in Adobe Illustrator. This is a popular method for professional artist’s, but you need access to Adobe’s Creative Cloud Suite and a desktop computer in order to run the software.
Is there another way you can do this without leaving the iPad and no need for an expensive monthly subscription? Yes! And that is what I’m here to demonstrate today.
What You Will Need
You will the following apps installed on your iPad :
- Procreate
- Adobe Capture (free app, no CC subscription required)
- Affinity Designer (or Vectornator)


Learn Calligraphy
on the iPad
from Scratch!
Create stunning calligraphy in Procreate with no experience or special tech skills (even if you have messy handwriting and don’t think you’re creative enough)
WATCH THE FREE WORKSHOPBefore we get into it, you might be wondering about my choice of using Affinity over the free app, Vectornator …. You could use Vectornator for the 2nd part of this tutorial, and you are more than welcome to do so. (The majority of the process is the same – you would simply open your SVG file in Vectornator instead of Affinity Designer for the tweaking stage).
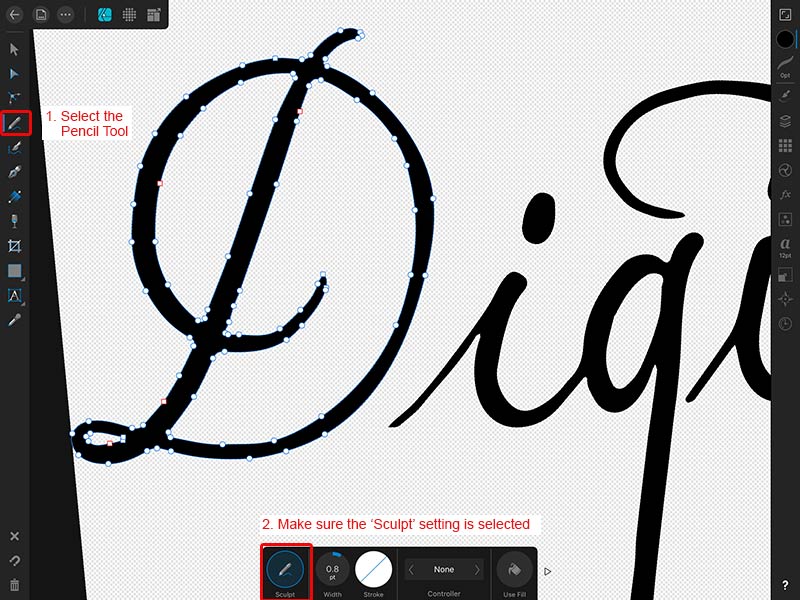
The main reason I favour Affinity, is because of a special setting on the pencil tool called ‘sculpt’ . The sculpt setting makes editing this kind of vector a lot easier. When using an automatic trace process like Adobe Capture, it creates a lot of nodes on the vector shape (as you will see in the video). As long as the Sculpt preference is selected, you can simply run your pencil along the edge of the path to smooth it out, giving you a very fine level of control.

This definitely produces the best result with the least amount of effort and time (as opposed to editing individual nodes by hand). But like I say, it is up to you and depends on how much vectorising you do as part of your workflow.
On with the tutorial!
If you would like to learn more about why Vector artwork is an important part of the design process, you can read more about that here.

Cristel Design
Thanks a lot for this post! I have affinity designer but have not started to use it yet. The combination with Adobe Capture makes everything so much easier, I was amazed that just by saving it as svg it was converted into a vectorized file, so easily! Thanks a lot!
Nicole Mauloni
Thanks for reading Cristel! So glad you found it helpful. Yeah, it’s definitely an easy process once you know how 🙂
Ashley A
I’ve searched high & low for this info! Thank you so much. I prefer to do my lettering in Procreate but I also want to have my work featured on greeting cards. I’ll be doing this tonight!!
Nicole Mauloni
Thanks so much for your comment Ashley. It’s great to hear when a tutorial has helped. I’d love to see your greeting card designs when you are finished too!
Bri
Nicole, after I’ve uploaded my svg to affinity, how do I get the image to automatically vectorize? I can’t find an option to trace my letters. I noticed in your video, your artwork automatically traced itself without you having to do anything.
Nicole Mauloni
Hi Bri. There is a step needed before Affinity in order to convert to vector. As the video shows, you can use Adobe Capture to trace the artwork automatically. You then export SVG / vector from AC and open this file in Affinity. Hope that helps!
Whitney
Hi, Nicole! Thanks so much for the tutorial!
I’m stuck on the step where I smooth out my letters in Affinity. I saw in your video you selected the letter D and then you were able to trace the lines to smooth it out. No matter what I do, the sculpting tool doesn’t stick to my lines and makes odd shapes instead. I’ve googled nonstop and can’t find a solution.
Nicole Mauloni
Hi Whitney. It sounds like you may need to turn your ‘Sculpt’ setting on. I’ve added an image within the blog post above to help explain, but once you have your pencil tool selected, you’ll see a contextual menu at the bottom of the screen and ‘Sculpt’ on the left. Make sure this is selected and you should be good to go! Hope that helps
Joanne
Such helpful tips! loving not having to now do on my computer
I just wanted to ask what’s the settings you put on your artboard in procreate i’m finding my calligraphy is very pixelated when converting in capture
Nicole Mauloni
Hi Joanne, thanks for the kind words! 🙂 Your document settings will depend on what you need for the finial result. I tend to work with 3000 x 3000 pixel canvas and use 300dpi to ensure the quality is high enough for most situations. Hope that helps!
Kristen Stansell
Hi Nicole! Thank you so much for this video! I had no idea it could be this simple to convert to vector. I’m having two issues that I’m wondering if you could help with. 1) when I put my artwork in Capture only parts of it appear. It’s a black and white png from procreate. 2) when I go to save the file there is not an option to save as svg. It just saves an image to my camera roll. Any help would be amazing! Thank you so much.
Nicole Mauloni
Hi Kristen, Thanks for reading. I’m happy to take a look at this for you. Please send me an email with a screen grab and I’ll see if I can help. Thanks
Jul
This was so helpful for vectorizing a little drawing. I was hoping I could do it completely on the iPad and yeah, it worked. Thank you for this tutorial!
Nicole Mauloni
You are so welcome Jul. Glad it helped. Thanks for reading!
Kristen
Hi Nicole! Thank you so much for this video! I had no idea it could be this simple to convert to vector. I’m having two issues that I’m wondering if you could help with. 1) when I put my artwork in Capture only parts of it appear. It’s a black and white png from procreate. 2) when I go to save the file there is not an option to save as svg. It just saves an image to my camera roll. Any help would be amazing! Thank you so much.
Charlotte Luykx
Thanks for this!!! I installed vectornator unfortunately when uploading the SVG file the app crashes 🙁 if I install affinity you think it will work?
Thanks a million in advance ….