I’m on an organisation overhaul right now. From cleaning out old clothes, baby toys and things around the house we no longer need. It’s so satisfying to know where your stuff actually is and not be surrounded by clutter!
There’s another area of my life that needs a tidy up, and that’s my Procreate brush library.
If you’re like me, you can’t resist grabbing a great brush set or downloading that freebie sample! Usually I’m in the middle of something else but I’ll go ahead and download and install into Procreate, then get back to what I was doing only to lose them in the sea of a thousand others! There’s no way to search for a particular brush in Procreate, so it’s down to your own organisation skills to find them again.
Well I went back through my library and did some sorting and I want to share the top 3 tips I found most useful for organising your Procreate Brush library.

Learn Calligraphy
on the iPad
from Scratch!
Create stunning calligraphy in Procreate with no experience or special tech skills (even if you have messy handwriting and don’t think you’re creative enough)
WATCH THE FREE WORKSHOP1. Do a clear out
It sounds super obvious, but the most useful things often are. Do a clear out first! While most brushes are very small in file size storage wise, there are some that are surprising large. This can be due to having a grain or texture that requires the brush to use an image pattern. A surplus of brushes could be taking up precious iPad memory space, not to mention making it more difficult to find what you actually need.
Take a minute to scroll through your library. Do you really need ALL those brushes? Get Marie Condo with them. If it doesn’t spark joy, you know what to do!
It’s good to have a few favourites in each category, but think about what style you practice most. Be ruthless. You’ll get so much more out of what you keep if you can reduce the clutter.
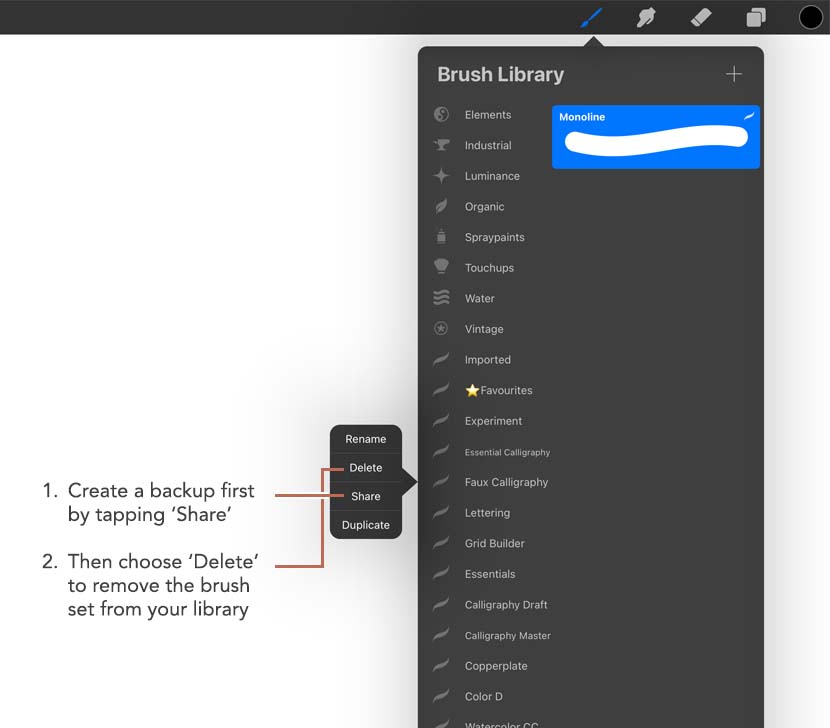
Make sure you have a backup first before deleting anything though because once you do, you can’t get it back. Tap on the brush set name and you’ll see a popup appear. Choose the ‘Share’ option and you can then choose ‘Save to files’ and find a folder (or create a new one) on iCloud or Dropbox.
Then to delete the set, just tap on the set name again and choose delete!
2. Organise your brushes by type
Once you’ve got your library down to a manageable size, it’s time to group them into categories. Think of 4-6 categories that best describe the styles you most work with.
We’ll now create new sets with your category names as labels. These won’t hold any brushes, but will serve to divide your brushes by type.
So create a new set by scrolling to the top of your brush set list and you’ll reveal the ‘+’ button. Tap on it to create a new set. I like to label mine in a way that makes them easily distinguishable in the list. I put 2 dashes, then an emoji, the category name, then finish with 2 dashes ie. “— ????️Lettering —“.
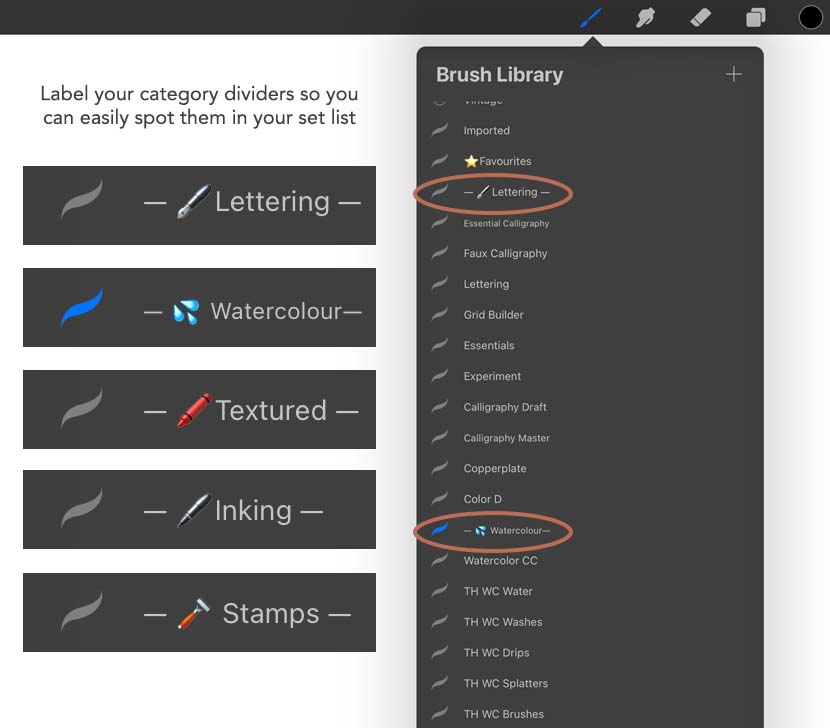
The full category list I went with was :
- Lettering
- Watercolour
- Textured
- Inking
- Stamps
You don’t have to use these same categories, they can be anything you like. Just choose groups that broadly describe most of your brush sets.
Once you’ve created all your category labels, you then want to pull any brush sets that fit into that group under the label set. For example, I have my ‘Lettering’ label, then all my lettering brush sets under it, then my ‘Watercolour’ label and all my watercolour brush sets follow that one, etc. You get the idea!
You’ll end up with a much more organised library and know exactly where to look when you’re trying to find a particular brush!
3. Backup your Brushes (a tricky faster way)
Now that things are tidier and more orderly, it’s time to back it up! I’ve lost count the amount of times someone has told me they lost their entire Procreate library due to some mishap or other, so now is the perfect opportunity to make sure that doesn’t happen to you! Especially after you did all that clever organisation work ????
It’s important to also do regular full iPad backups using iTunes so you can restore your work, but that’s not the kind of backup we’re talking about today. I want to backup brushes in a way I can access them individually if I ever need to. A full iPad backup is a complete clone of your iPad where you can’t see individual files or folders within it.
Now we’ve got that cleared up…
Saving each individual brush set can be a time consuming chore. So I want to show you a little tip to save several at a time to speed things up!
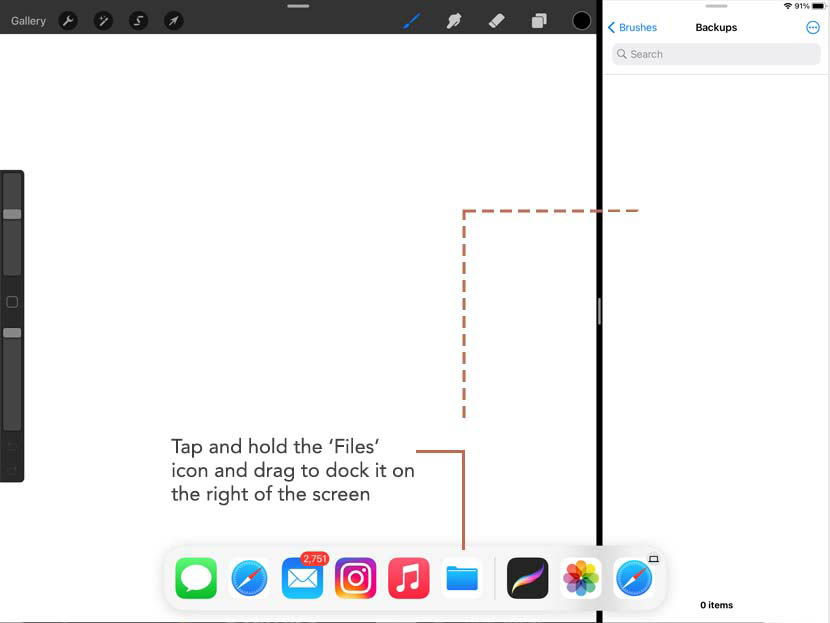
First we want to bring up the ‘Files’ app to be split screen with Procreate. To do this simply slide your finger up from the bottom of the screen. You should see a little arrow appear which you can use to pull up your dock panel. You’ll see a file icon within your dock. Tap and drag this to the right of your screen and you’ll have both Procreate and the Files app active and open onscreen!
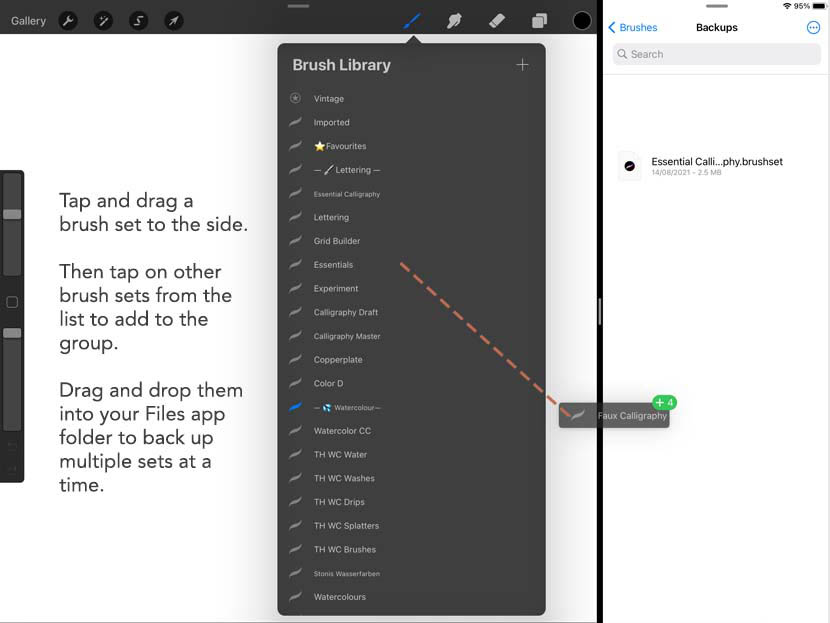
It’s probably easier to do this part with your fingers rather than your pencil. Tap and hold one brush set, move it to the right slightly so you can see it follow your finger. Keep a hold of this set, and using your other finger, tap on another brush set. You should see a little number appear next to your floating, original brush set. This is indicating you’ve ‘picked up’ another set and you now have both of them selected. Go ahead and grab a few more. Note: I wouldn’t do more than 6 – 8 at a time though to make sure the backup doesn’t crash.
Once you have your brushes, drag them to the right side of the screen and drop them into you iCloud or Dropbox folder in the Files app. And voila! You just backed up multiple sets at once. Definitely makes backing up a little easier doesn’t it!
And that’s it! You know have a much more organised looking brush library. I’m sure you’ll rediscover some old favourites in there too!

Odette
What a simple yet brilliant solution!
My brush menu looks great now! It will be much easier to find brushes.
Thank you!
Emerald
I love your idea! My problem is that I just started Skillshare and Procreate less than 2 months ago. I also started following blogs on digital planning and lettering. Well, I got hooked! So this is what I did…
I signed up for Envato Elements for a month, Vecteezy for a month, Creative Fabrica for a month AND got the Brushes app for $9.99! Thank God I’m down to just Creative Fabrica. I just found that site a week ago.
So… what happened is I have downloaded THOUSANDS of dollars worth of EVERYTHING to do with Procreate. Plus vector, textures, watercolor, digital planners, stickers, clipart, etc…
I say all this so you will understand why I am now totally lost! I have HUNDREDS of premium procreate brush and stamp sets now and some don’t have a pdf showing a preview. I don’t remember what they looked like.
So far, I’ve been taking a lot of watercolor classes. Other than that, I don’t know much about what the other brushes do. So now I have a ton of folders that I have to slowly go thru as I learn what each brush is. I wish I would have taken screenshots of each set as I was downloading them!
I’m not complaining tho. I’m thankful I have the brushes! I’m just really struggling getting organized. Before I cancelled my monthly subscriptions, I downloaded a ton of Adobe Illustrator brushes and vector too. I also started downloading stuff for Affinity. That’s my next goal. ???? I’ll try to wait a few months before I go crazy downloading Photoshop stuff. I barely know how to use those programs yet. What a mess I am lol. ????????♀️
Anyway, I’m really learning from you. Thank you for all that you do!
Bradley
Awesome video! I recently started using Procreate and went brush and stamp crazy right from the start! I was hoping there was a brush ‘nesting’ feature, but I love your idea of category ‘brushsets’ to separate the types. That’s gold!
Nicole Mauloni
Awesome to hear Bradley. Yes hopefully there will be some sort of nesting feature in a future update. Thanks for watching!
Denise Cauchi
I love your idea of arranging your brushes in Procreate. My problem is that I don’t have emojis on my Procreate keyboard. They are on my main keyboard though. How can I get them on the Procreate keyboard, please. I am new to an ipad.
Nicole Mauloni
Hi Denise, thanks for reading and your question! The emoji set should be part of your keyboard without having to do anything. The size and layout might differ depending on the size of your iPad or what function you are using the keyboard for, but if you’re renaming a layer for example, there should be a little smiley face in the bottom right corner of the keyboard. If you press that, the letters will swap to the emoji library! Hope that helps but let me know if not!
Anthony Wood
Thanks heaps! Found you with a search to tame my brush chaos, didnt know these features existed! Much appreciated!