If you’ve visited this website before, it’s probably no secret my favorite app for Calligraphy on the iPad is Procreate. You can purchase it on the app store for the small price of $5.99 but it in fact cost me a lot more. It was the reason I moved my calligraphy to digital (which meant getting an iPad Pro)! While you can still instal Procreate on older versions of the iPad, its true power lies in brush sensitivity settings which are only available on the iPad Pro with the Apple Pencil (or other pressure sensitive styluses).
Based in Tasmania Australia, Savage Interactive are the developers behind Procreate. They won an Apple Design Award in 2013 for the most innovative software from independent developers. Procreate has 64 bit colour, 250 levels of undo (a life saving feature on many occasions) and 128 brushes are included with the app. It also is compatible with the Apple Pencil and other styluses. While it’s not as versatile as Adobe Photoshop, it’s certainly an impressive setup!
SI released a massive update at the end of last year. In this post we’ll take a look at how to take advantage of the best features included in the release.
1. The Quick Menu
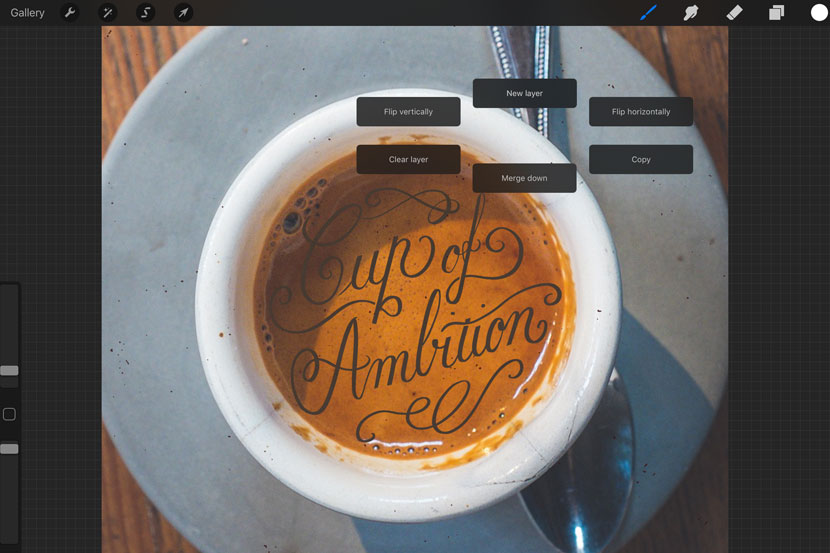
The Quick Menu gives you easy access to 6 menu items… quickly. It took me awhile to discover this feature because it’s not active by default. You need to turn it on within your preference settings. To do this, click on Actions (the wrench icon), choose Preferences and then Advanced Gesture Controls. You’ll see the Quick Menu box with a toggle switch which you can slide to ‘On’. From this screen you also change the gesture assigned to activate the menu (mine is set to one finger tap).
Tapping anywhere on the canvas with one finger brings up the menu. By default the actions include : Flip Vertically, New Layer, Flip Horizontally, Copy , Merge Down and Clear Layer.

You can easily change the actions within the menu – simply tap and hold the button. A menu bar will appear with more options. I recommend choosing actions that are a couple of steps away to make the most of it. For example, you wouldn’t assign ‘undo’ to it as you can easily access that in one tap from the main menu. A good use could be brushes you use on a regular basis.
To turn off, just click anywhere on the screen outside of the menu.
2. Layers
Selecting Multiple Layers & Layer Groups
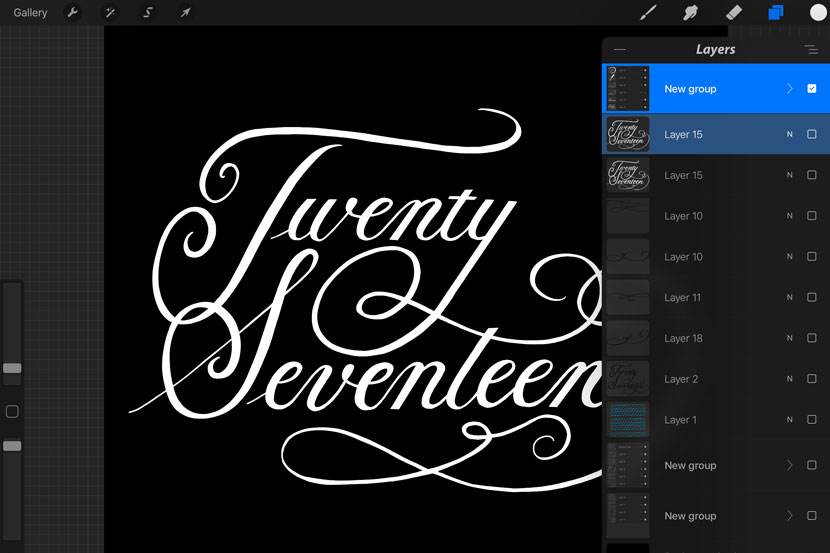
Probably my favorite addition is the extended functionality of layers. You can now select multiple layers, add layers to their own groups and select multiple groups! This is extremely helpful as sometimes you may have several different layers such as your fill, strokes and shadow and want to move them together as a whole without merging into one layer.
To select multiple layers, swipe the first from left to right to select it (you’ll see the layer highlight in blue). Then do the same to another layer. You can now move these together. Or if you want to create a group, just tap the icon to the top right of the layer panel.
Another way to group layers is to drag one on top of another and it will automatically combine these layers into a new group (tap and hold the first and you’ll see you can move it easily). You can then select multiple groups and move or transform them together.

Blending Modes
If you’re familiar with other painting applications like Photoshop will be happy to hear Procreate now supports blending modes! To access a layer’s blend mode settings, just click the little letter ‘N‘ next on the thumbnail and the panel will expand. Options include: Multiply, Linear Burn, Color Burn , Lighten, Screen , Color dodge, Overlay, Hard Light, Soft Light, Exclusion, Difference, Subtract, Hue, Saturation, Color, and Luminosity. With panel open, you also have the ability to change the opacity. You can get some really interesting effects using blend modes so it’s worth experimenting.
3. Photoshop File Format Compatibility (.PSD)
Working in design professionally, I use Adobe Photoshop on a daily basis so one was huge for me. Previously you had to import image files one at a time to build a multi-layered file. You could always export Procreate files to Photoshop, but not the other way around. And now you can! Procreate will even preserve settings such as locked layers or layer groups. Compatible filters and blend modes are also imported, plus, if you have any vector objects or text layers they are rasterized and remain intact! Brilliant!
4. Fast Undo and Redo
If you like me and constantly undoing strokes that go amiss, the fast undo feature is helpful. By holding down two fingers on the canvas, you can rapidly go back multiple steps to get back to where it all went wrong.
5. Recording at Real Time
Last but not least, you can now record a video of your process in real time! An early iteration of this feature gave the ability to playback your process as a hyper speed video. You may have seen it in action on Instagram. This was always a great feature, however you couldn’t adjust the speed of the playback or omit any part of the process.
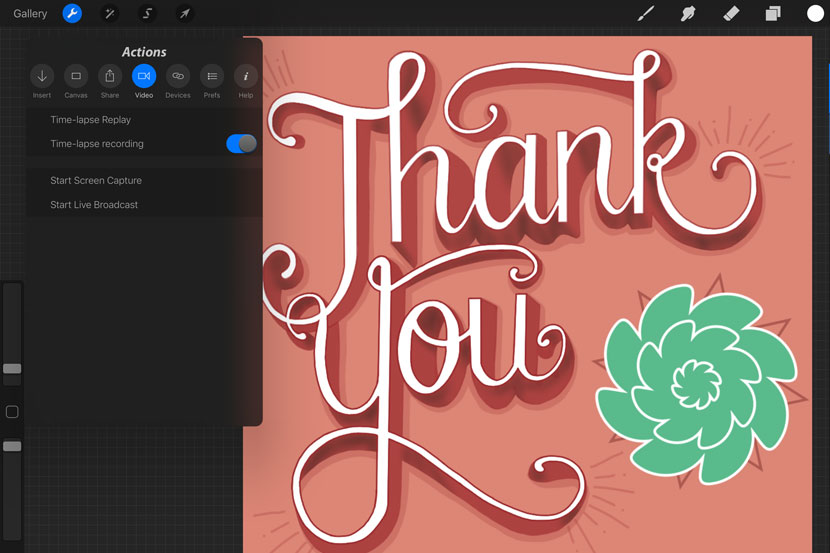
With something like calligraphy, you often don’t have enough actions to give a very long video in hyper speed (it can be so quick you don’t even see it). With the latest update, you can now record videos in real time and choose when to start the capture.
To turn this tap on the ‘Start Screen Capture‘ option from the video settings panel (shown below).

Once you’re happy with your recording you can choose to save it locally or share it straight from the app by choosing ‘Export’ under the share menu. You can also broadcast your recording live to compatible services such as Periscope, Mobcrush and Shou.
Edit: Something I’ve seen a lot of people get stuck with when recording in real time is they try to ‘Export’ the real time video. This is totally understandable as that is exactly how you would do it when using the Hyper Speed Video. If you want to see the recording you just made choose ‘Stop Recording’ for the top menu. It will pop the video over the canvas and you can save it directly from there. Choosing ‘Export’ will still have the same function as before ie. export your hyper speed video, not the recording.
For the full set of instructions for Procreate, you can download the owners manual here. I’d recommend having a read if you haven’t already. It’s a handy reference to gesture shortcuts that speed up your workflow.

Angie- bobo
Gah! I love that quick menu tip! I’m really digging the new update. So much amazing flexibility!
Thanks for sharing!
Angie
http://www.bobodesignstudio.com/blog/2017/1/26/death-before-decaf
Nicole
I agree Angie! Quick menu is a great feature. Particularly for easy access to your favourite brushes. I’ve got a delay set on mine as I was finding it would pop up unexpectedly.