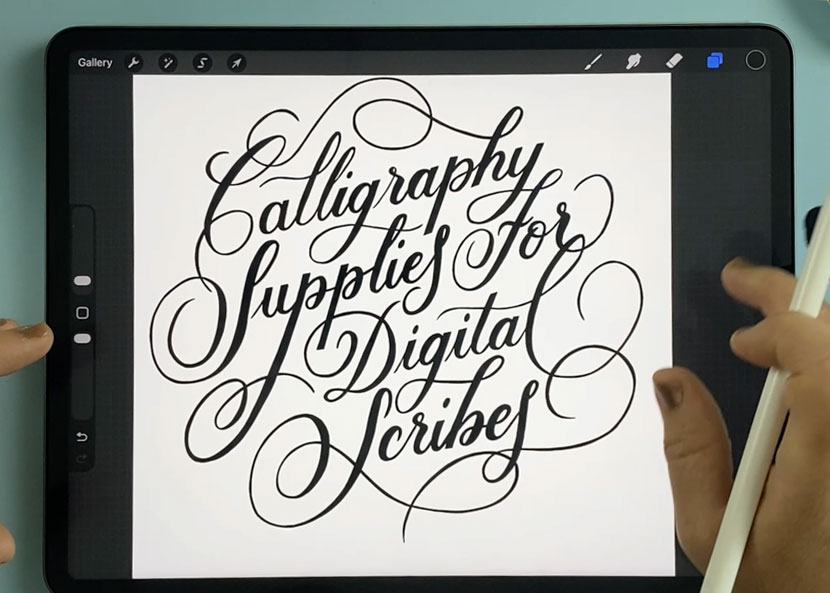
If you’ve been around my world for a while, you’ll know I’m usually glued to the iPad. Procreate + Affinity Designer is my happy place, and that’s where I teach most of my digital lettering and design.
So when I say this Affinity update made me put the iPad down and open my Mac… you know it’s a big one.
Before we get into the details, here’s the full step-by-step tutorial, including the iPad workaround and a real lettering example ⬇️
Watch the video above if you like to see things in action. If you prefer to read (or want the written steps to refer back to), keep going.
Why This Affinity Studio Update Is Such a Big Deal
Here’s the short version of what’s changed and why I’m so excited about it:
- Affinity Studio is now completely free.
No subscription, no one-time purchase, no catch. You can just… download it and start.
- It finally includes Vector Image Trace.
You can take your Procreate artwork (or any pixel image) and turn it into real vector paths, right inside Affinity. - The iPad app isn’t here yet… but I’ll show you a workaround.
You can still use your iPad + Apple Pencil as part of this workflow today. - This isn’t just a party trick. It unlocks Affinity’s best vector editing tool.
Once your art is traced, you can use Sculpt Mode (my favourite vector tool EVER) to refine your lettering in a really natural, drawing-like way.
Now let’s walk through the exact process I demo in the video.
Step 1: Export Your Artwork From Procreate

I’m starting in Procreate because that’s where so many of us create our lettering and illustrations. If you’re using another app, you can skip down to Step 2, everything from there is universal.
Before you export:
- Turn off any guidelines
- Make sure the artwork looks the way you want it to look as a vector
Then:
- Go to Actions > Share
- Choose PNG (or JPEG if you prefer)
- Save to Files / Dropbox, or AirDrop it straight to your Mac
Once the file is accessible on your computer, you’re ready for Affinity Studio!
Step 2: Set Up Your Document in Affinity Studio

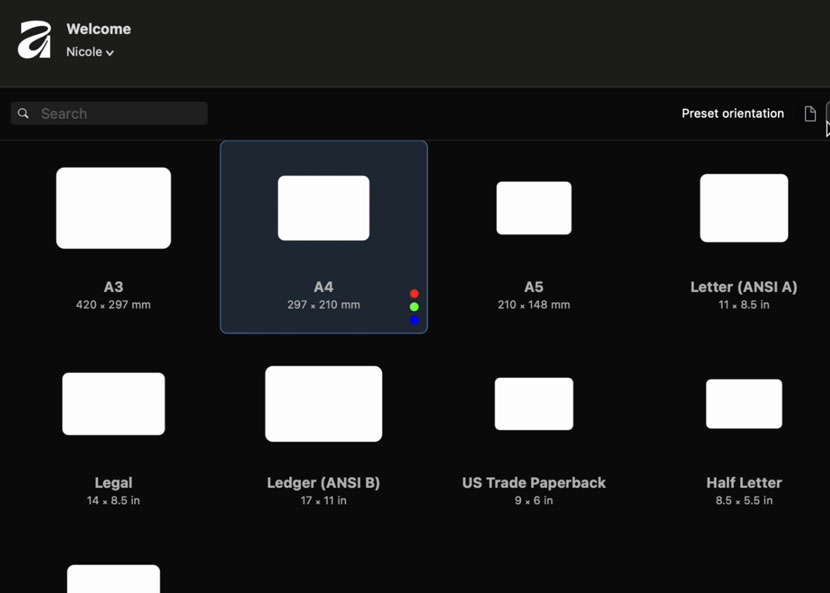
Open Affinity Studio and:
- Go to File > New
- Choose a preset size (I used A4, landscape, RGB)
- Click Create
- Then go to File > Place, select your artwork, and click on the canvas to drop it in
- Resize and centre it using the bounding box handles
At the top of the interface, make sure you’re in Vector Mode, that’s where the Image Trace tool lives.
Step 3: Trace Your Artwork into Vector (new feature!)

Here’s the star of the show, Vector Image Trace.
With your image selected:
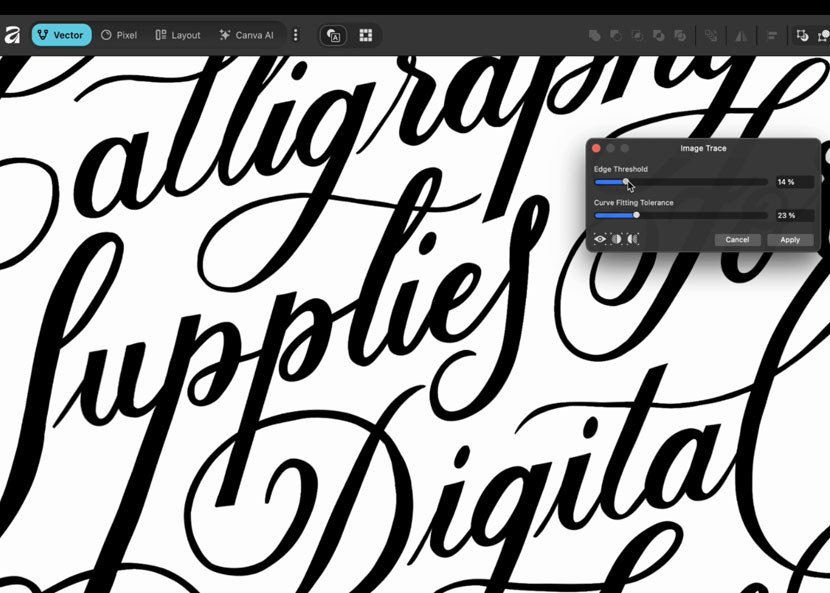
- Go to Vector > Image Trace
- A panel opens with two main sliders:
Edge Threshold
How sensitive the trace is to edges.
- Lower values: cleaner, bolder shapes (great for solid lettering).
- Higher values: more subtle detail picked up.
Curve Fitting Tolerance
How tightly the vector follows your original strokes.
- Lower values: smoother paths with fewer points.
- Higher values: more points and sharper corners.
You can use the preview icons at the bottom of the panel to compare the before and after via:
- Vector only
- Split view with a draggable divider
- Side-by-side comparison
Tweak until you’re happy, then click Apply.
In a couple of seconds, your Procreate lettering is a real vector shape.
Before this, you needed Illustrator or a separate app in the middle (like Adobe Capture or Linearity Curve) to get that result. Now it’s all in one place!
Step 4: Clean Up the Vector for a Professional Finish

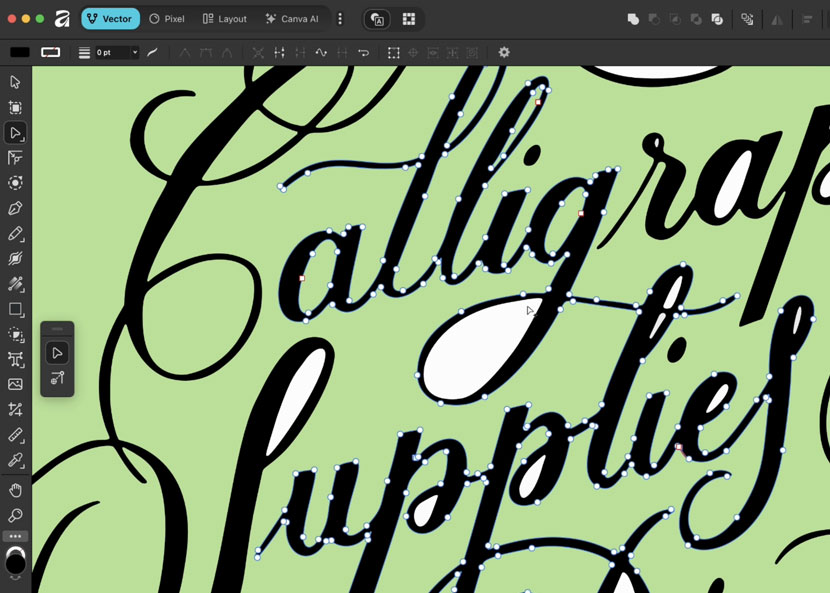
Image trace in any app usually needs a bit of tidying, especially for lettering. The idea is to end up with one nice clean shape that’s easy to recolor and refine.
1. Remove the white background
- Add a solid-colour rectangle behind your artwork so you can see what’s going on.
- Double-click into the vector group and select the white background.
- Hit Delete on your keyboard.
Now you’ll see your letters sitting directly over your coloured background.
2. Punch out internal shapes (holes in letters)
Things like the counters in o, e, a, p etc. should be proper cutouts, not just white shapes.
- Double-click to enter edit mode.
- Select the main letter shape, then Shift-click the white shape inside it.
- Click Subtract button in the top right menu.
Repeat this for each internal shape around the design. This “punches holes” through the letters so they behave like real vector shapes.
3. Merge everything into one unified shape
When you’re happy with the structure:
- Stay in edit mode.
- Shift + select all the separate pieces that make up your lettering.
- Click Add to merge them into one single vector.
You’ve now got a clean, editable vector version of your artwork, ready for the fun part.
Step 5: Refine with Sculpt Mode (Affinity’s secret weapon)

You could go in with the Node Tool and drag points around one by one… but there’s a much nicer way to refine curves, especially for lettering.
This is where Affinity’s Sculpt Mode comes in, and it’s the main reason this workflow I’m about to show you is more than “just for fun.”
- Select the Pencil Tool.
- In the top toolbar, there’s a small circle icon for Sculpt. Turn if on.
Now, when you draw over an existing path, Affinity doesn’t create a new stroke, but it reshapes the path underneath which what you just drew.
It feels a lot like drawing directly on your letters to nudge the curve into place. No wrestling with tiny nodes.
On a mouse, it’s… okay.
With a stylus, it’s amazing.
Which is why the next bit is important….
Bonus: How to Use Your iPad + Apple Pencil with Affinity Studio Today

At the time of writing, Affinity Studio isn’t on iPad yet. That’s coming, but I didn’t want to wait to use Sculpt Mode with my Apple Pencil.
If you have both a Mac and an iPad, you can use Apple’s Sidecar feature to turn your iPad into your main display for Studio.
On your Mac:
- Open System Settings > Displays
- Click the + button and connect your iPad
- Set your iPad as Use as Main Display
Now Affinity Studio runs on your iPad screen and you can use your Apple Pencil to refine the vector! Sculpt Mode suddenly feels like you’re drawing your letters directly in vector form.
One thing to note: your brain will probably try a Procreate style two-finger tap to undo. Those gestures don’t work here because it’s still technically a desktop app. But the trade off is worth it for how natural Sculpt Mode feels with the Pencil.
This combo – free Studio + image trace + Sculpt Mode + iPad workaround – is what makes this release so exciting for lettering artists!
To quickly recap the big wins:
- Affinity Studio is completely free – which removes a huge barrier if you’ve been curious about vector, but not ready to commit to Illustrator.
- Vector Image Trace finally lives inside Affinity, so you can go from Procreate artwork to clean vector shapes in a couple of clicks.
- The iPad app isn’t here yet, but with Sidecar you can already bring your Apple Pencil into the workflow.
- And most importantly… this isn’t just a cool trick. It lets you tap into Affinity’s best vector editing tool – Sculpt Mode – and refine your lettering in a way that actually feels creative, not technical.
If you’d like to be notified as soon as Affinity Studio officially launches on iPad – and get early access to my iPad-specific training for it – you can join the waitlist here.
In the meantime, grab the free app, try this workflow with one of your Procreate pieces, and see how it feels to “draw your vectors” instead of just editing them.
