**Please Note: if you are looking for Vector instructions using your iPad only (without need for a desktop), please click here.
So you’ve been practicing hard, your lettering and calligraphy skills are improving leaps and bounds. You post your work to instagram and other social media channels and your friends are starting to notice.
Maybe one of them has asked you to design a logo for their business. Or maybe you were asked to help with a wedding invitation or a commissioned print. What do you do? You haven’t worked in print design before and are worried you’ll do something wrong and don’t know where to start.
Don’t worry. Today, I’m going to show you a very simple method for getting your Procreate lettering into vector format so you can scale it up or down easily without loosing quality. This will ensure the artwork is ready for print at whatever size and format you need.
What is a Vector & Why is it Important?
Let’s first look at the difference between working with pixels (like we do in Procreate), and Vector art. Pixels are made up of tiny little squares. When you paint or draw in Procreate you are filling those physical pixel squares with colour. The problem is, if you want to then scale your lettering to a larger size, you will start to see some fuzziness around the edges as you stretch the pixels. After all the effort you put into perfecting those curves, this is the last thing we want!
This is where vectors come in. Vector artwork is mapped by the curved outline of the shape (from point to point). This means the artwork keeps its form at any size. You can scale it up or down as many times as you like, and the design will still appear crisp without any loss in quality. It is rendered by those points and their relationship to one another.
In most cases (almost all), logos are created in vector format. This will suit the various instances it needs to be published, like a website, a business card, or even a 10 foot billboard. The format of the artwork file might change back to pixels for delivery to the printer or web designer (ie. .jpg, .png, .tiff), but the master file you use to size and export that image will be a vector (file extension ‘.ai’ in illustrator).
I’ve given you a very simplified overview but if you want to geek out over it, you can find other articles online for more in depth information.
Now we know what a vector is, how do we make one?
How to Create a Vector
In order to create vector art, you need Vector software installed on your computer. A few of the most popular choices include Sketch, Inkscape, or Adobe Illustrator. In this tutorial, we’ll be working in Illustrator. If you haven’t got a copy, you can download a trial version which you can then use free for 30 days. It is a skill worth knowing if you want to create something you can use in these situations.
The best way to learn something new is by doing it. Now is the time to get out your iPad, find a piece of lettering you have created in Procreate so you can follow along. It doesn’t have to be the perfect lettering. For best results, I recommend using a piece that is fairly simple. Preferably black and white, without lots of shading and texture. Got one ready?

1. Export your Lettering from Procreate
Step 1
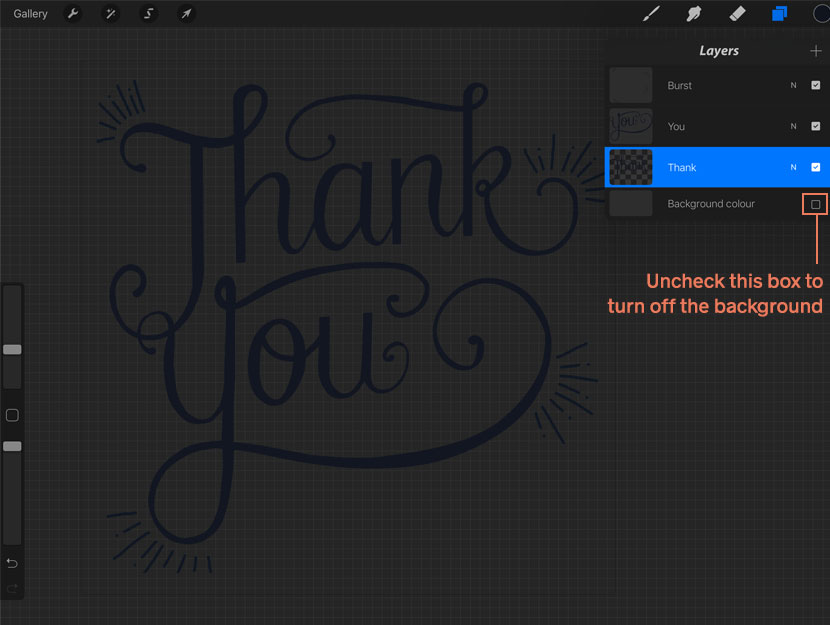
Open your artwork in Procreate and turn off your background layer (tap the the check box next to the layer thumbnail in the layer panel). You should now see the lettering on the Procreate grid background.
Step 2
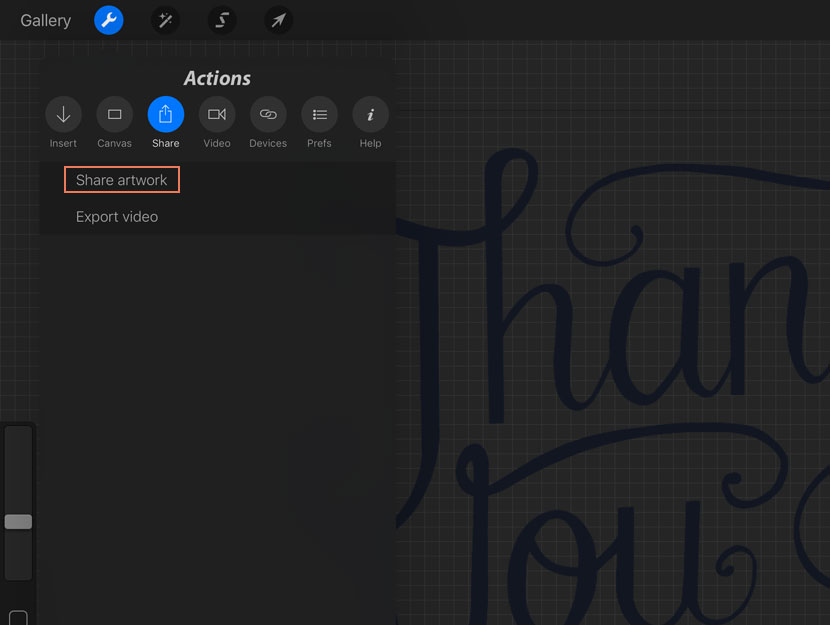
Next we’ll export the artwork as a .png file. This file format allows you to keep the transparency and save it without a background.
To do this tap on the wrench icon in the top toolbar. Select the ‘Share’ menu panel, and tap ‘Share artwork’. Choose ‘.png’ as the format and save in a location you can access from your computer (like Dropbox or iCloud). If you’re not set up on either of those, you can save the image locally to your iPad and email it yourself to pick up on your computer.
2. Open your Artwork File in Illustrator
Step 1
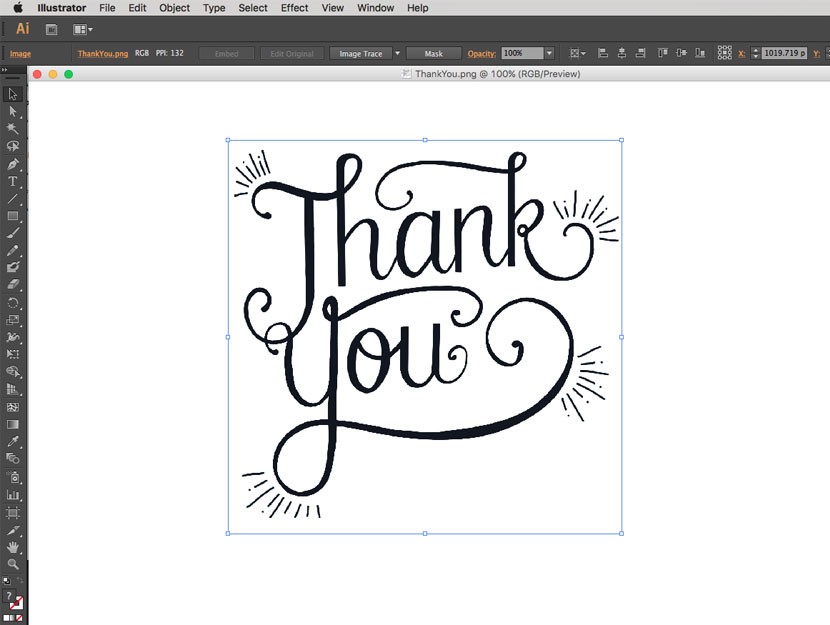
Fire up Adobe Illustrator on your computer. Choose ‘Open’ from the ‘File’ menu drop down and locate your png file. This will open the artwork on a canvas in Illustrator.
3. Create your Vector with Image Trace
Step 1
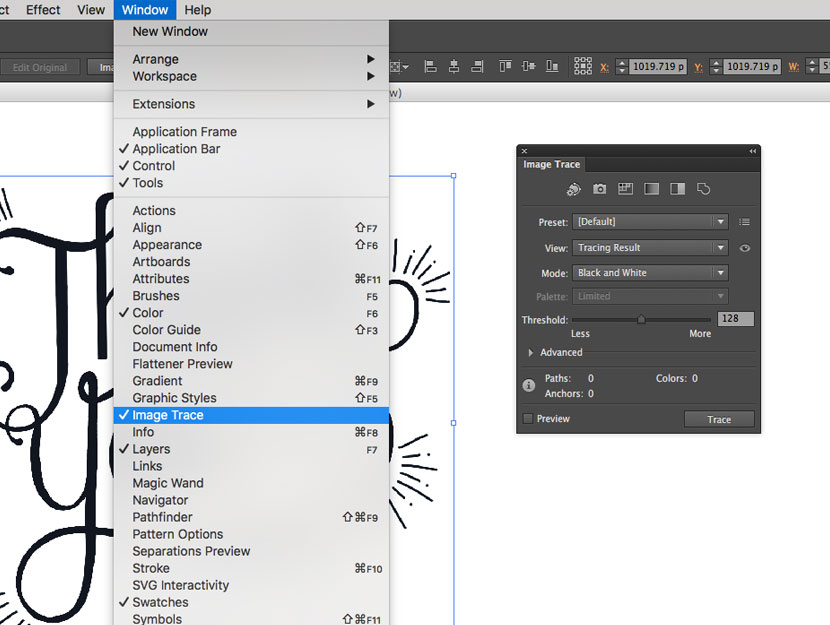
Next, open the ‘Window’ drop down from the main menu and choose ‘Image Trace’. This will reveal the Image Trace panel and give us access to the settings.
Step 2
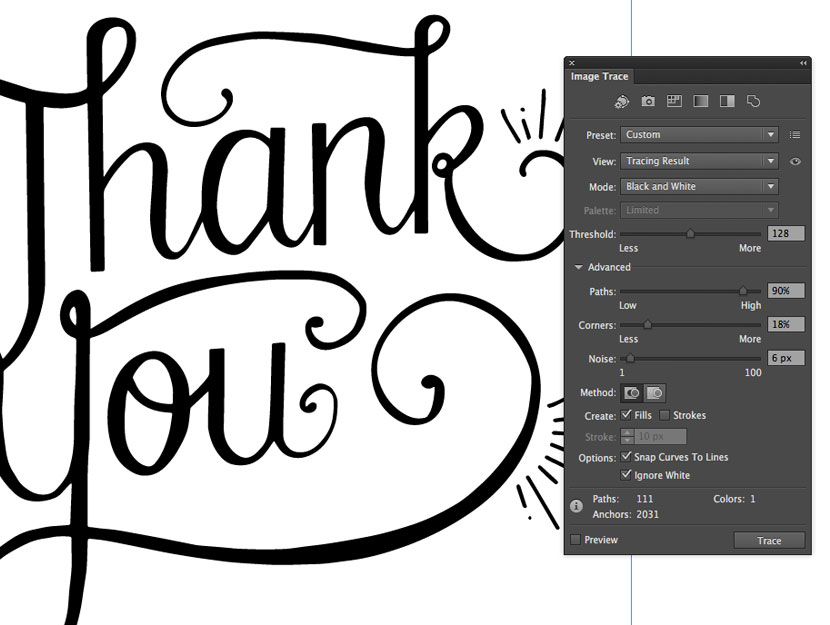
Now with your Image Trace Panel open, we can adjust the settings to create our vector art. There is no hard and fast rule about this, but adjusting the values will get us closer to the look of the original drawing.
Expand the ‘Advanced’ settings of your Image Trace options. You’ll see you have a few levels available to play with. Rolling your mouse over the each will give more information of what each setting controls.
Make sure you select the ‘Preview’ check box. This allows you to see the effects of any changes you make. You might want play around and see what suits your work most. Zoom in to see how the levels are adjusting the shape.
I like to increase the value of my ‘Paths’. This gives a tighter fit and is more accurate to the drawing (especially if you have a really hand drawn look you are trying to preserve).
Decrease your ‘Corners’ setting to smooth out the path.
Bring your ‘Noise’ setting right down too.
Finally, tick the ‘Ignore White’ box. This will extract the white background from the vector so you have your lettering as one shape. As we saved the lettering out as a transparent png, we don’t really need to do this. If you had a flattened black and white image, this setting is very helpful and allows you to easily remove the background.
Step 3
When you are happy with your trace settings, just hit the ‘Expand’ button in the top toolbar.
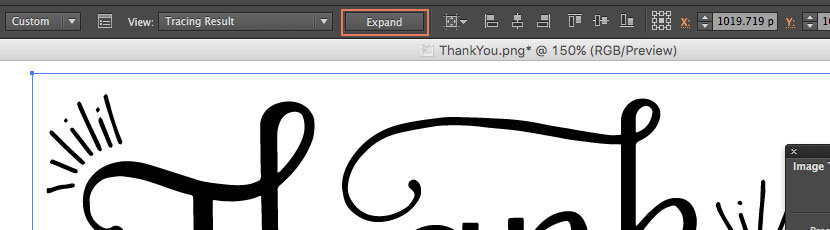
And voila! See those points around your lettering? You now have a vector graphic. If you add a coloured shape underneath, you’ll see there is no background. Just your lettering as a vector shape. You can easily change colour, scale it up and down as many times as you need and your lettering will remain clean and sharp!
You could even do a test with the .png file to see the difference in quality when you scale.

Step 4
Finally, we need to save the file. Click on ‘File’ from your main menu and choose ‘Save as’. Pick a name for your artwork and make sure the format is .ai (this will keep the file in vector format).

That’s it, we’re done! Surprisingly easy wasn’t it?
There are more complex ways of creating vectors by using the pen tool (particularly for script and monoline lettering). This method is quick and easy, and often all you need to get a scalable vector you can use in a variety of ways.
Amanda
This is so helpful! Thank you!
Nicole Mauloni
So glad to hear that, thank you Amanda!
Emily
Any way this can be done all on the ipad? I don’t have access to a desktop.
Kristen
This is so helpful. The one thing I can’t figure out is which size is appropriate in procreate. When I drop my procreate file into illustrator it says the file is too big. Then it tells me to rastercize but I still can’t get it small enough? Do you know what to do about this?
Nicole Mauloni
Hi Kristen, glad you like the tutorial! Any of the standard default canvas sizes from Procreate should be fine. Maybe check you are dragging the ‘.png’ or ‘.jpg’ file into illustrator and not the ‘.pro’ file?
Reyna
Thank you for this! It was so helpful!
Brandon
Im not sure if this is still a popular topic but I found a workflow that works for me and keeps it all within the iPad. I do my raster design in Procreate. I export that to a .png locally or in a cloud drive linked to the iPad. I then open that .png in the Adobe Capture app under the Shapes tab. There you can refine your now vectorized image. You can then save it and share it as an .svg file, again locally or to the cloud. You can open that .svg in Affinity Designer and edit it like you would any other vector image, all without ever leaving the iPad.
Hope this is useful to any future visitors who might be interested in this type of workflow.
Nicole Mauloni
Thanks Brandon! Yes, this is still a really popular topic… I’ll be releasing tutorials on different methods on the iPad soon.
Violet
BRANDON I LOVE YOU SO MUCH RIGHT NOW. ❤️❤️❤️❤️❤️❤️❤️❤️❤️❤️❤️❤️❤️
Maira
Thank you for this blog post, Nicole. This is extremely helpful, Brandon! I know this comment was a long time ago, but I’m just now coming across to this post and have a question… When you say “I do my raster design in Procreate” are you referring to the regular procreate lettering? or anything else in specific to vectorize the lettering without using the computer?
Lottie
I have tried this but it is just picking up little pieces of my design on Adobe Capture app under the Shapes tab? do you know why this is?
Sara
I searched far and wide for ANY info on how to do this, and your blog post is so simple and SO SO helpful. Any more tutorials for Illustrator would be very welcomed! 😉 I know they’re time consuming, so I know I’m reaching LOL — still, this was just what I was looking for.
Mandy
This is my first time trying this. Your steps are fantastically easy. Just had a bit of trouble resizing the artboard to cover my whole design. I got it figured out tho. My question is; when I go through these steps and save, is that all I need to do? If I’m working on a logo and need to submit a file for advertising or business cards, do I submit the .ai file?
Nicole Mauloni
Hi Mandy, I’m glad you found this useful! Nice work on figuring out the canvas resize 🙂 Most printers will accept .ai files, but you may need to put the design inside a template so it’s correctly sized and to mark the bleed area. If you were designing a business card for example, you can find the sizing and Illustrator templates to use as a guide. Try searching on Google or Creative Market to find a template. Thanks for reading and good luck!
Cass
hey! first of all, THANK YOU for making this! It was so helpful. My question is, when I am sending off the logo to the client, what format do i send it to the client in? I’ve saved it as a vector, but I’m not sure what to do from there. Thanks so much!
cass
Kara
can you accomplish this in the 9.99 a month version of adobe illustrator ?
Nicole Mauloni
Yes, you can import a jpg or png of the lettering and use ‘Live trace’ in Illustrator to create a vector
Estefania
This is very helpful! thank you so much.
But I have a question..
Is it possible to immediately export a drawing in procreate as a vector?
Nicole Mauloni
Hi Estefania, thanks for reading. Unfortunately no, you can’t export a vector directly from Procreate