*** Please Note: Since Procreate has been updated, there are now more efficient methods. Click here for Installing on your iPad (without a computer), and here for installing with a computer + iPad. ***
There’s nothing more frustrating than downloading new Brushes for Procreate and hitting problems when trying to install them. While importing the brushes into the app itself is straightford enough, transferring the brush files to your iPad can be slightly trickier. This post will help troubleshoot those issues and get your new brushes up and running!
Brushes can either be supplied as ‘open’ files (usually several links ending in ‘.brush’ which are readable by Procreate), or as a ‘zip’ (one file ending in the extension ‘.zip’). Zip files are an easy way to transfer several files in one download, but you will need to extract them before use.
I want to make sure you have clear step-by-step instructions for how to install brushes in both these cases, and either from your computer to transfer to your iPad, or directly on your iPad.
Please note: If you have access to a computer, it is easier to download the brushes there first and then transfer to Dropbox or iCloud for access on your iPad (don’t worry, it’s free!). It also allows you to keep your files in a central place so you don’t loose them.
Downloading Procreate Brushes To Your Computer and Transferring to your iPad
Let’s look at the easiest option first. We’ll go through both file types (.zip files as well as open .brush files).
Step 1 – Download the Brushes
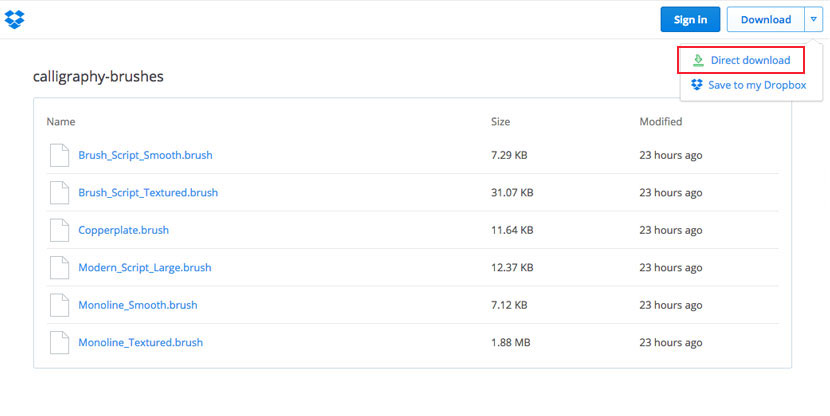
When you click a link for your brushes, one of two things will happen. The file will automatically download to your ‘Downloads’ folder, or you will see a ‘Dropbox’ window with a Download button.
If you see the Dropbox window, click the ‘Download’ button at the top right and choose ‘Direct Download’.
If your files are zipped – Locate the file you just downloaded. If you are on a Mac, in most cases it will have automatically extracted the zipped file for you. If not, just double click the zip file and your extraction software will open and you can access the contents from there.
Step 2 – Transfer the Brush Files to your iPad
You now have a couple of different options for getting the files onto your iPad. You can either transfer them via an app like Dropbox or iCloud, or email them to yourself from your computer and download the email attachments on your iPad.
We’ll start with the app option first, but just skip down to see the instructions for email if that’s what you prefer.
Transfer to your iPad via Dropbox or iCloud
If you have a Dropbox account already set up, copy the files into a central ‘Brushes’ folder to keep them organised. For example, I have a ‘Procreate’ folder in the root of my Dropbox account and inside that, a folder called ‘Brushes’.
If you don’t have a Dropbox account you can set one up for free here. It might be worth doing this if you’re using your iPad regularly as it’s an easy way to transfer files into Procreate.
iCloud is another easy way to move files between your computer and iPad. If you have an account set up, simple move your brush files into a folder on your iCloud drive. It is free for a limited amount of space, with paid options for more storage space.
Once you have your files saved in either of those two applications, make sure you give it a little time to sync, then open Procreate and follow these steps:
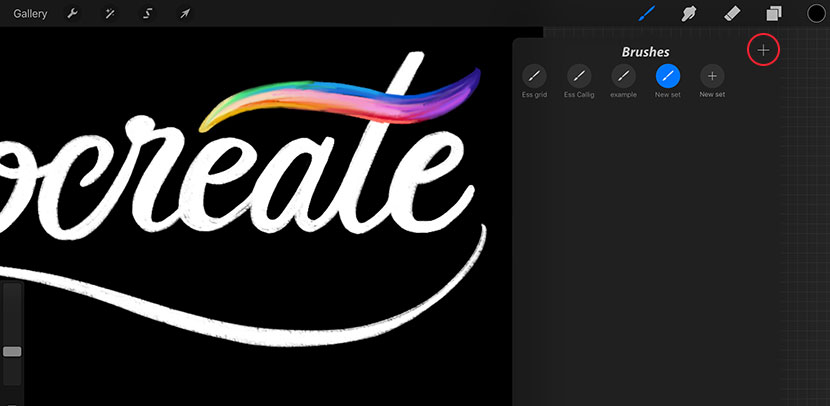
1. From the Brushes Menu, tap on the plus icon
2. Tap on the ‘Import from…’ option
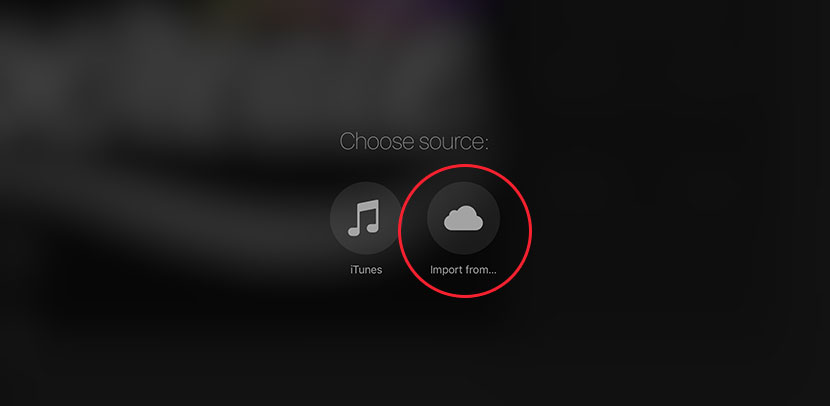
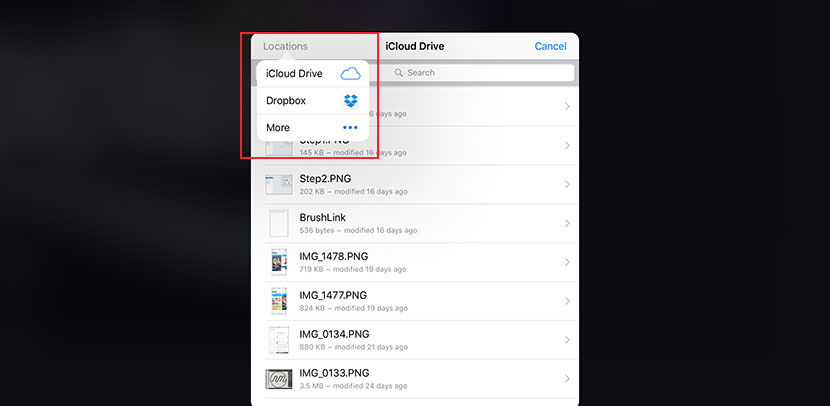
3. This will take you directly into your iCloud drive. If you chose to save your files there, navigate to the folder and select them. If you chose Dropbox instead, see the next step.
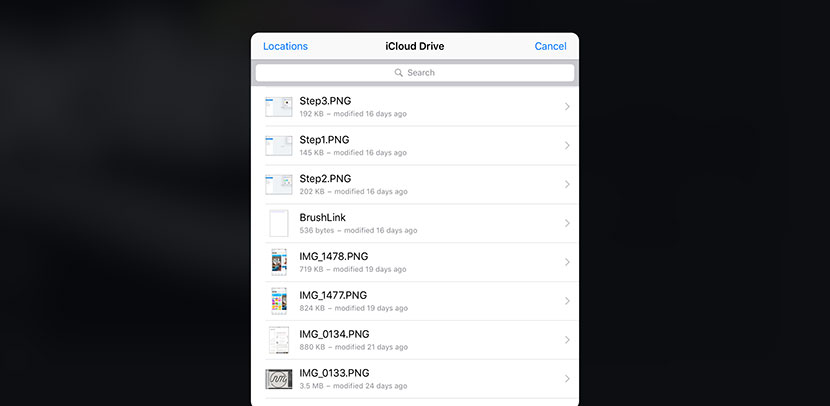
4. To locate the brushes in your Dropbox folder, simply tap the ‘Locations’ menu at the top left and choose Dropbox. This will take you to the root directory of your Dropbox folder. Navigate to where you saved your brush files and select them.
Repeat the above steps for each of the brush files.
Transfer to your iPad via email
If you don’t use Dropbox or iCloud, you can simply email the files to yourself from your computer and open the email on your iPad.
To do this, attach the brush files to an email addressed to yourself. Open your email on your iPad and click on one of the attached .brush files. It will open a window with the option of ‘Open in Procreate’. Click this link and voila! Your brush will be loaded in the app. Repeat this step for each of the brush file attachments.
Downloading Procreate Brushes Directly to Your iPad
Whether your files are zipped or not will have more of an impact if you are opening directly from your iPad without a computer. There’s no default zip software included with the iPad, so it’s a little more complicated, but it can be done!
We’ll look at the easiest option first (opening .brush files directly), and then cover what to do if your files are zipped.
Downloading .brush Files on your iPad
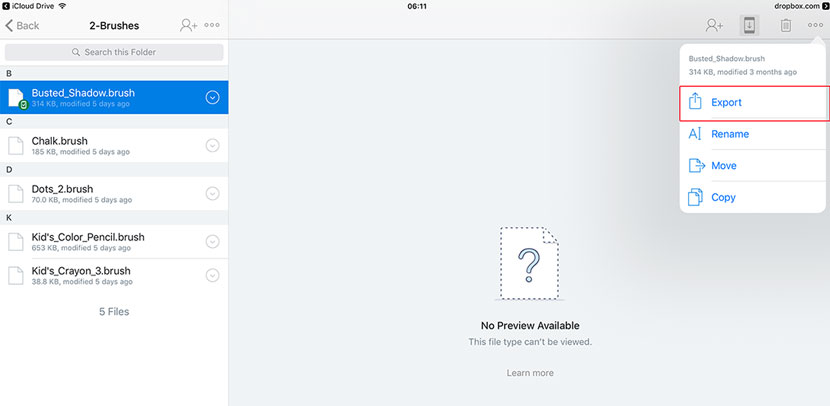
On clicking the download link, you will see the .brush files listed in Dropbox.
1. Select one of the .brush files and click the top icon on the right with the 3 dots. Choose ‘Export’ from the drop down menu.
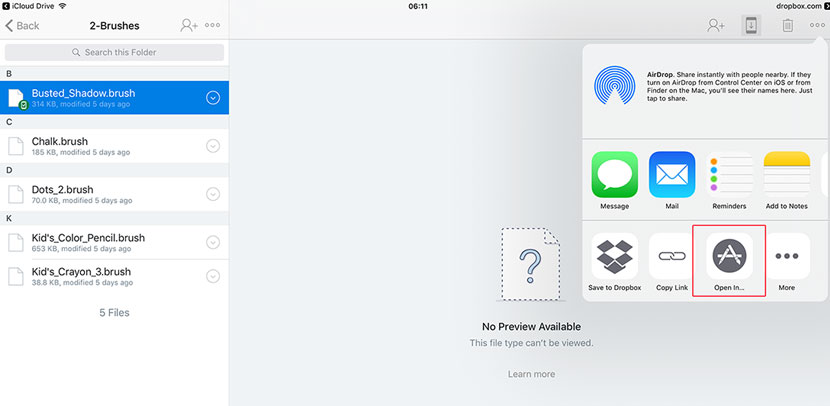
2. Select ‘Open in App’ from the menu.
3. Then choose ‘Copy to Procreate’.
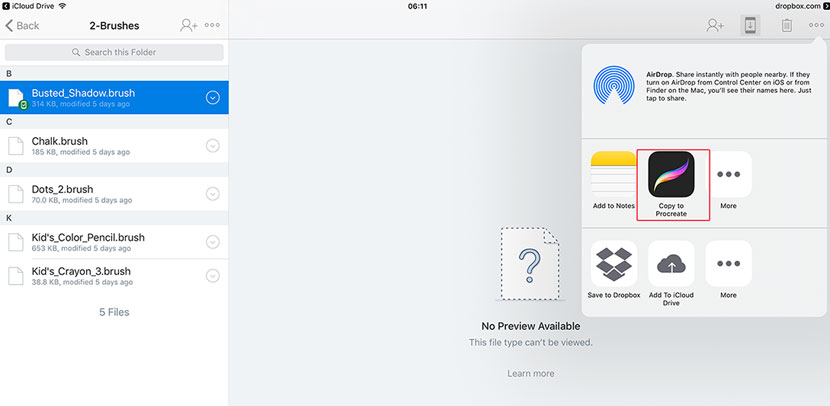
In Procreate, when you open your Brushes Menu, you will see your new brush has been installed! Repeat these steps for each Brush file.
Downloading .zip Files Directly on your iPad
Lastly, here is the steps to follow if you are opening ‘.zip’ files directly on your iPad. You’ll need to install a free app first in order to do this.
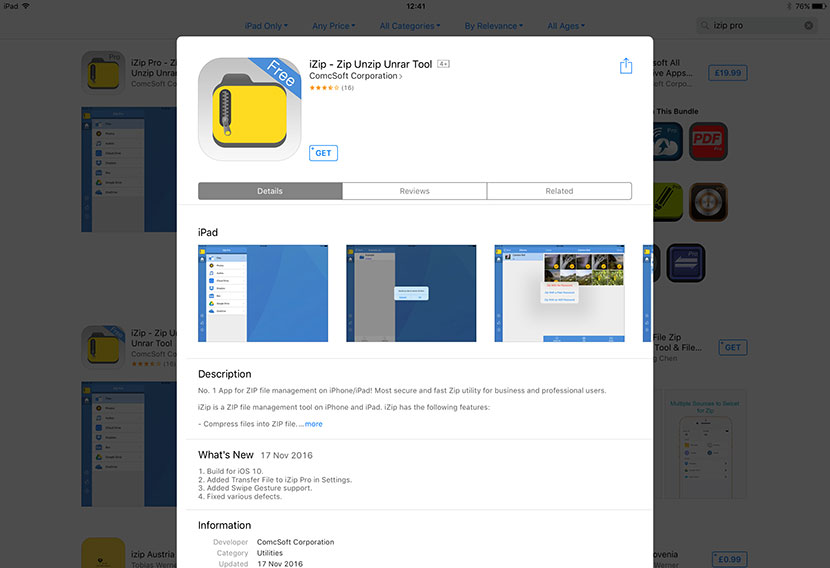
1. Open the App Store from your iPad and search for the free App ‘iZip’. Tap on ‘Get’. You will see a pop up asking you to ‘Buy’. Don’t worry, it’s free. Tap on Buy to install the app.
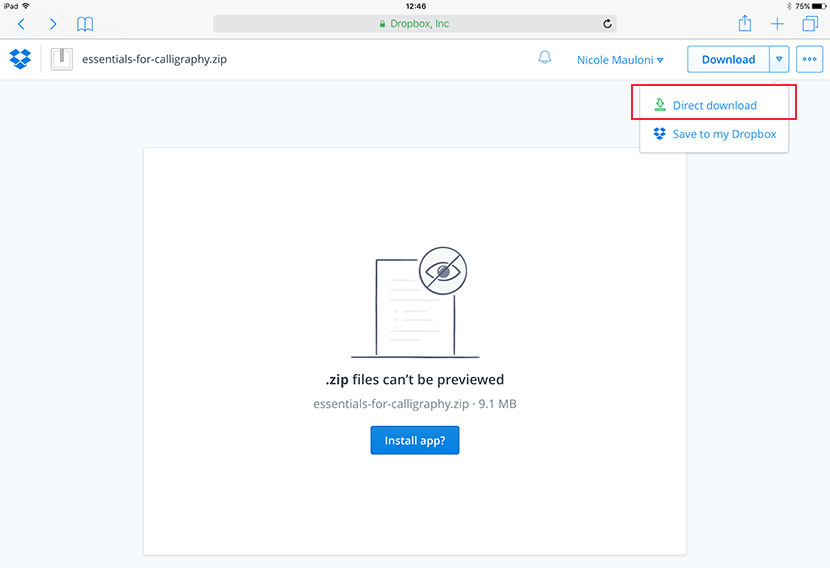
2. Open the link to your zipped brush files in safari. You’ll see the Dropbox window showing the zip file. Tap on the ‘Download’ drop down menu and choose ‘Direct download’.
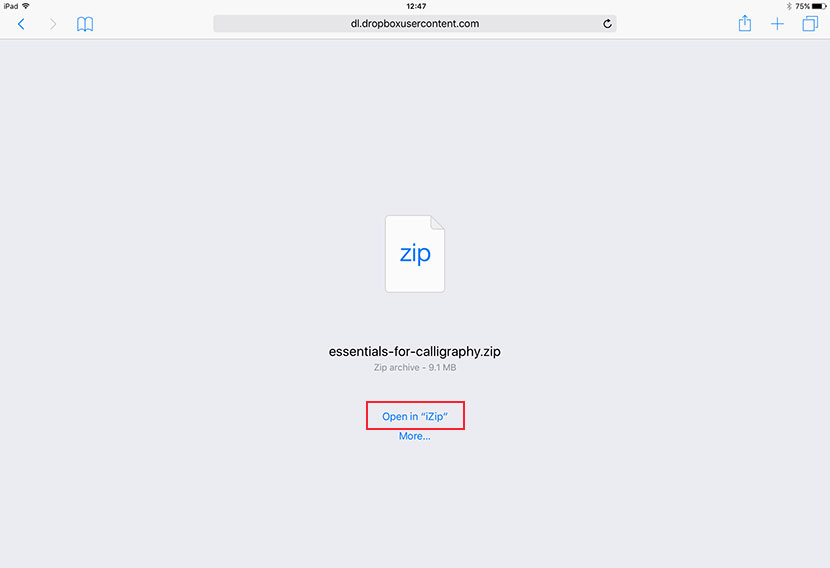
3. You’ll see a zip icon and the name of the file. Tap on the ‘Open in iZip’ link.
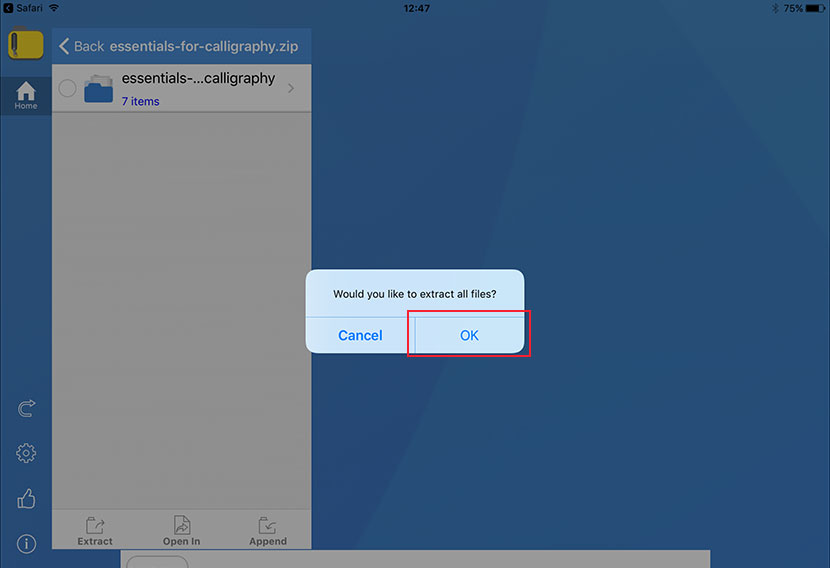
4. The iZip App will open and you’ll see a prompt asking you if you want to extract all files. Choose ‘OK’.
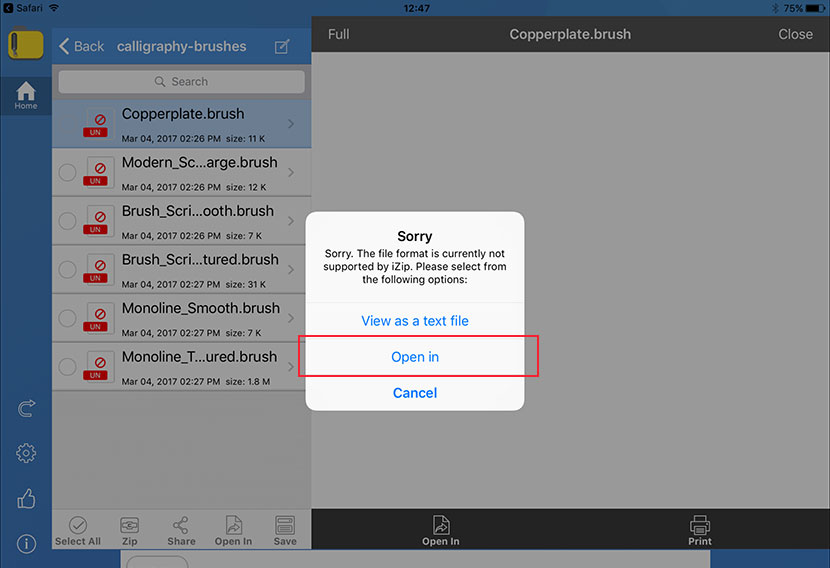
5. Once the zip file is extracted, you’ll be able to view the contents. A lot of brush packs will include instruction PDF or text files as well as the .brush files themselves. Locate the .brush files and tap on one of them. You’ll get a dialogue box saying the file can’t be opened. This is fine, just choose the ‘Open in’ option.
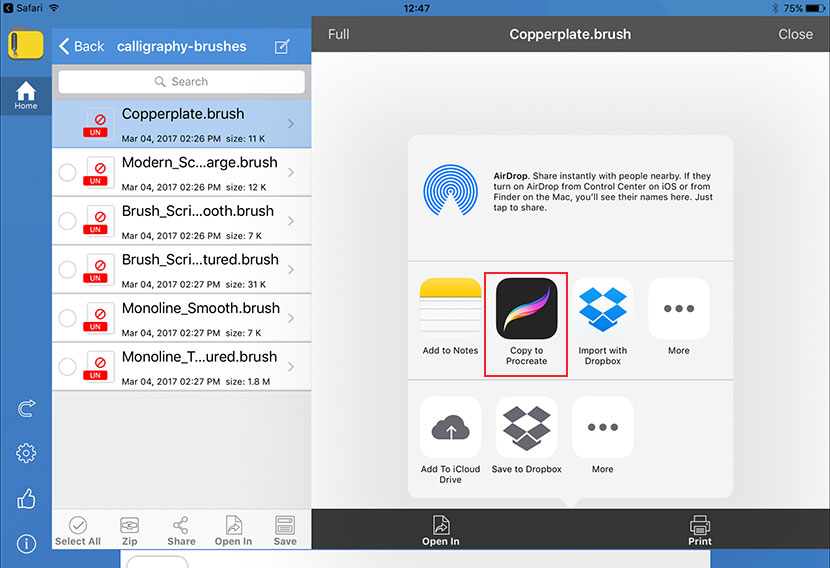
6. Choose the ‘Copy to Procreate’ option and Procreate will open showing your new brush file! Repeat these steps to install each brush. That’s it! You’re ready to create beautiful things.
I hope this article helped troubleshoot any issues you may have had installing new brushes in Procreate.
Now you can get on with the fun bit. Happy creating!
Get the Free Email Course
Sign up to the free email series for a step-by-step guide to the basics of Copperplate Calligraphy on the iPad Pro with Procreate.
You'll get immediate access to the first module covering the Basic Strokes, and further emails containing 5 new lowercase letters at a time for a-t of the alphabet.
Detailed instructions, Quick Tips, and Procreate Practice Drills included!
Sofi
Hi, I have an iPad mini (it is jot the latest one, but it IOS is the same 12.0.1) and qhen I install a brush it appears perfectly in the brushes section but it works as any other brush, not as it should work. I mean it appears with the name that it shoukd have but it doesn’t work as the one that it said. It is always the same normal one. What is happening?
Nicole Mauloni
Hi Sofi. If I understand correctly, you are having trouble with a brush you have installed in that it doesn’t seem to work as it should. What elements of the brush are failing ie. pressure, texture or opacity? Are you using a pressure sensitive stylus and running the latest version of Procreate?